Air Scrubber for Mold Explained (6 Safety Tips for Homeowners)
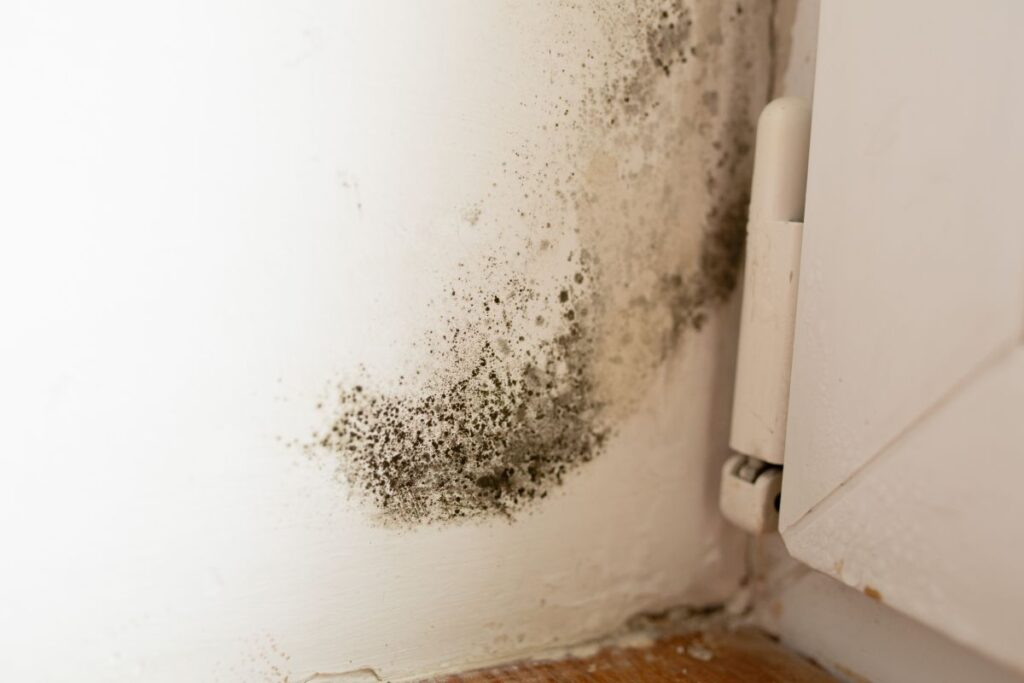
Mold in your home is not just an eyesore – it is a real threat to your family’s health and the integrity of your structure. If you have noticed musty odors, visible growth on walls, or worsening allergy symptoms indoors, an air scrubber for mold may be one of the most important tools in your remediation plan. Homeowners in Clover and surrounding areas dealing with moisture issues deserve clear, practical guidance on how these systems work and when to use them, much like the broader solutions we cover through our indoor air quality services.
What you will learn in this post:
- What an air scrubber is and how it targets mold spores
- Why air quality matters during and after mold remediation
- Six actionable safety tips for using an air scrubber correctly
- How to choose the right unit and when to call a professional
- Complementary strategies that boost the effectiveness of air scrubbing
Why Air Scrubbers Matter During Mold Remediation
Mold remediation is a process that, when done incorrectly, can actually make indoor air quality worse before it gets better. Disturbing mold colonies releases millions of microscopic spores into the air, and without the right containment and filtration strategy, those spores can travel throughout your home and take root in new locations.
Air scrubbers are portable filtration units designed to pull contaminated air through a series of filters, most importantly a HEPA filter capable of capturing particles as small as 0.3 microns, which includes mold spores, bacteria, and fine dust. They are standard equipment in professional remediation projects and increasingly common among homeowners who want to take an active role in protecting their indoor environment.
- Spore containment: Air scrubbers create negative pressure in affected rooms, preventing spores from migrating to clean areas of the home.
- Faster recovery: Continuous filtration during and after remediation shortens the time your home remains at elevated spore counts.
- Health protection: Reducing airborne spore concentrations lowers the risk of respiratory irritation, allergic reactions, and long-term exposure effects.
- Peace of mind: Knowing your air is being actively cleaned allows families to remain in unaffected parts of the home with greater confidence.
For homeowners in Clover and surrounding areas, where humid summers can create ideal conditions for mold growth, having a reliable filtration strategy is essential. Understanding how to use an air scrubber correctly makes the difference between a successful remediation and one that simply moves the problem around.
6 Safety Tips for Using an Air Scrubber for Mold
Air scrubbers are powerful tools, but their effectiveness depends entirely on how they are deployed. Following proven safety protocols ensures you get the most out of the equipment and avoid common mistakes that compromise results.
1. Seal the Affected Area Before Running the Unit
Before you power on any air scrubber, the contaminated room must be properly sealed. Use heavy-gauge plastic sheeting and painter’s tape to cover doorways, vents, and any gaps that connect the affected space to the rest of your home. This containment step is what makes negative pressure possible and keeps disturbed spores from spreading. Running an air scrubber in an unsealed room can pull contaminated air into adjacent hallways and living spaces.
- Seal HVAC vents within the work zone
- Cover gaps under doors with plastic or foam tape
- Confirm that windows remain closed unless used for exhaust
2. Position the Air Scrubber for Maximum Airflow Coverage
Placement matters more than most homeowners realize. Set the unit near the primary source of mold contamination, not in the center of the room, to draw spore-laden air directly into the intake. Make sure nothing is blocking the intake or exhaust ports. In larger rooms, you may need more than one unit to achieve adequate air changes per hour.
- Place the intake side toward the contaminated surface
- Keep the unit elevated off the floor if possible to improve draw
- Allow at least 12 inches of clearance around all sides of the unit
3. Run the Unit Continuously During All Work Activity
An air scrubber only works when it is running. Any gap in operation during active demolition or cleaning allows spore concentrations to spike unchecked. Set the unit to its highest fan speed during work hours and reduce to a maintenance speed overnight. Many professional remediators in Clover and surrounding areas run units 24 hours a day for the entire duration of a project to maintain consistent air quality.
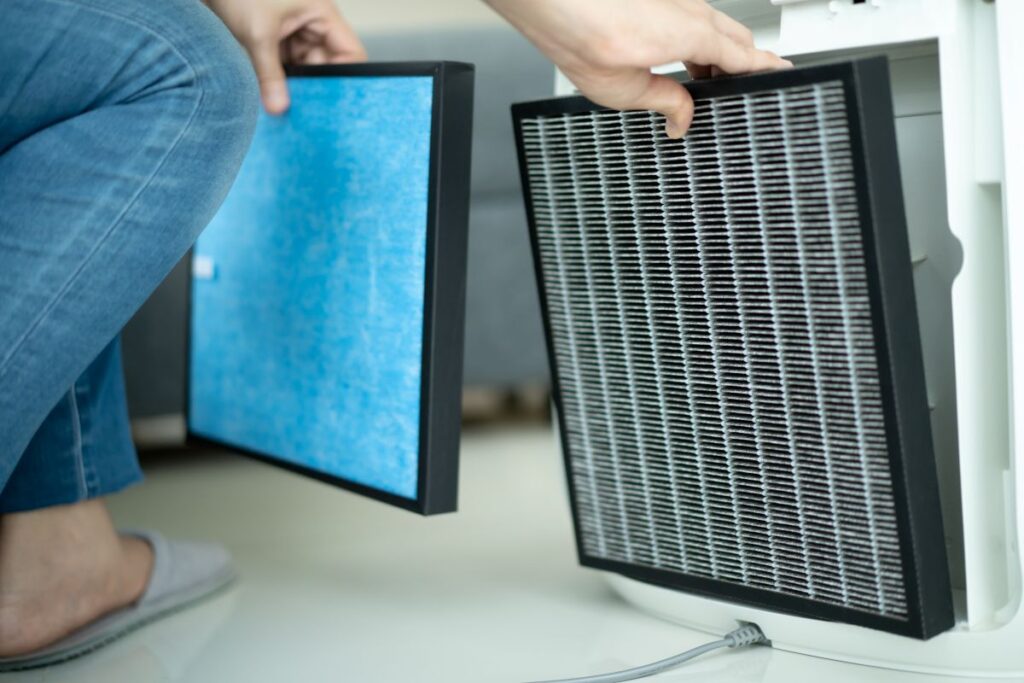
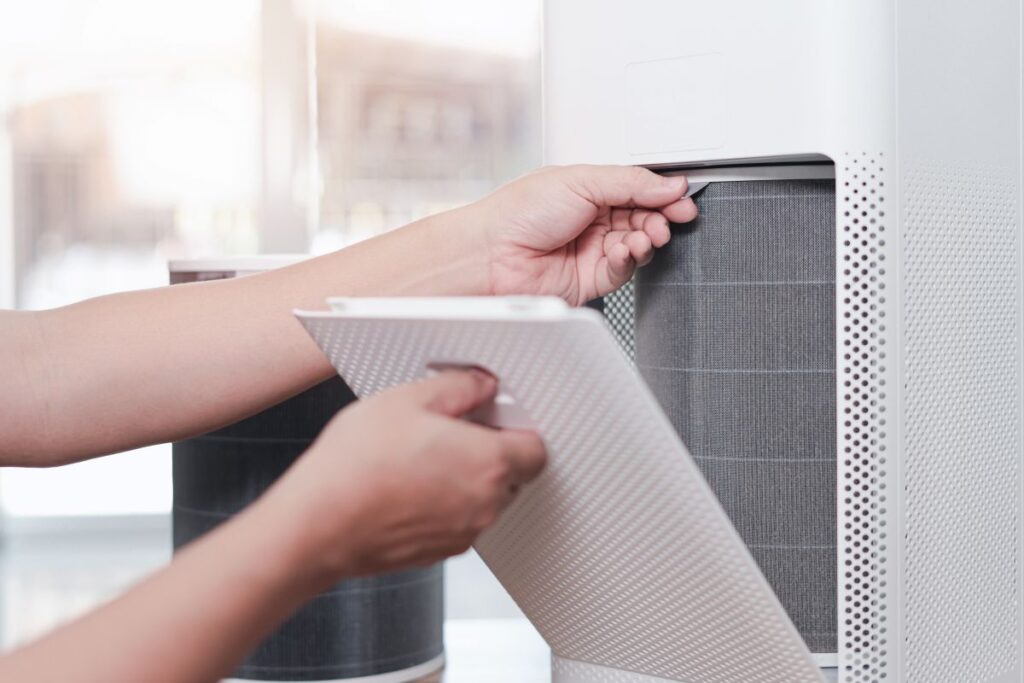
4. Verify You Are Using a True HEPA Filter
This distinction is critical and often misunderstood at the point of purchase. A true HEPA filter is certified to capture 99.97 percent of particles at 0.3 microns. A “HEPA-type” filter is a marketing term with no standardized certification and significantly lower filtration efficiency. Always verify that the air scrubber you are using contains a certified HEPA filter before using it for mold remediation.
- Check the product documentation for HEPA certification language
- Look for filters labeled “H13” or “H14” for the highest efficiency ratings
- Avoid carbon-only or basic fiberglass filter units for mold applications
5. Change and Dispose of Filters Safely
Used HEPA filters from a mold remediation project are considered contaminated material. Do not tap, shake, or blow compressed air on a used filter, as doing so releases the captured spores right back into your environment. Remove the filter while wearing gloves and an N95 or P100 respirator, seal it immediately in a heavy-duty garbage bag, and dispose of it according to your local guidelines for contaminated materials.
6. Monitor Air Quality and Protect Yourself Throughout the Process
Turning off the air scrubber and assuming the job is complete is a common and costly mistake. Use an indoor air quality monitor or hire a certified professional to conduct post-remediation air sampling before removing containment. Spore counts should return to levels at or below what is measured outdoors before you consider the area cleared. Personal protective equipment is equally non-negotiable during the entire project: wear a properly fitted N95 or P100 respirator, safety goggles, disposable gloves, and a Tyvek suit or clothing you can immediately wash in hot water after leaving the work zone.
- Replace your respirator if it becomes damp or damaged
- Never eat, drink, or touch your face while inside the containment zone
- Shower and change clothes before entering other areas of your home
Following these six tips will dramatically improve both the safety and outcome of any mold remediation project you undertake. That said, there are situations where professional involvement is not just recommended but necessary, and knowing those boundaries is just as important as knowing the tips themselves.
Choosing the Right Air Scrubber for Your Home
Not all air scrubbers are built the same, and selecting the wrong unit is one of the most common mistakes homeowners make when approaching mold remediation. The right choice depends on the size of the affected area, the severity of contamination, and how long the unit will need to run.
Understand ACH: Air Changes Per Hour
ACH refers to how many times per hour an air scrubber can cycle the total volume of air in a given room. For mold remediation, industry standards recommend a minimum of four air changes per hour, with six being preferable in heavily contaminated spaces. To calculate what you need, multiply the room’s square footage by its ceiling height to get the cubic footage, then find a unit rated to handle that volume at your target ACH.
Rental Versus Purchase
For a one-time remediation project, renting a commercial-grade air scrubber from a tool rental company or remediation supplier is often the most cost-effective option. Purchase makes more sense for HVAC contractors, property managers, or homeowners with recurring moisture issues who expect to use the equipment multiple times per year. Rental units in Clover and surrounding areas are typically available in 500 to 2,000 CFM ratings to match a range of project sizes.
Activated Carbon as a Secondary Layer
Some air scrubbers include an activated carbon pre-filter in addition to the HEPA stage. Carbon is excellent at capturing volatile organic compounds and musty odors associated with mold, but it does not capture spores on its own. A unit that combines carbon pre-filtration with certified HEPA filtration gives you the broadest coverage for both particle and odor control during remediation.
Complementary Strategies That Strengthen Your Results
An air scrubber is a powerful tool, but it works best as part of a layered approach to mold control. Relying on air filtration alone without addressing the underlying moisture source is like patching a leak without turning off the water.
- Source removal: Physical removal of contaminated materials, including drywall, insulation, and wood framing, is always the first priority. Air scrubbers filter what is airborne; they cannot treat surfaces.
- Dehumidification: Mold needs relative humidity above 60 percent to thrive. Running a dehumidifier alongside your air scrubber during and after remediation keeps moisture levels in check and prevents regrowth.
- HVAC inspection: Mold spores travel through duct systems with startling efficiency. After any remediation project, having your HVAC system inspected and your ducts cleaned prevents recontamination from a system that may have captured spores before you began the project.
- Moisture source correction: Whether the issue is a roof leak, plumbing failure, foundation seepage, or poor ventilation, fixing the source is the only way to ensure mold does not return. Air scrubbing treats the symptom; source correction treats the cause.
Homeowners in Clover and surrounding areas who combine all four of these strategies alongside proper air scrubbing give themselves the best possible chance of a lasting resolution rather than a temporary fix.
Ready to Clear the Air? Panther HVAC Can Help
Mold is a serious issue, and the decisions you make during remediation have long-term consequences for your family’s health and your home’s value. Using an air scrubber correctly, following the six safety tips outlined above, and pairing filtration with comprehensive moisture control gives you a real path forward. But even the best equipment cannot replace the expertise of trained professionals who understand how air systems, humidity, and building science all interact.
If you are dealing with mold concerns, poor indoor air quality, or recurring moisture problems, the team at Panther HVAC is here to help. Do not wait for a small problem to become a serious one. Contact us today to schedule a consultation and take the first step toward cleaner, healthier air in your home.
